
When people think about crafting with a Silhouette machine, they usually focus on the machine itself, the designs, or the materials. But one of the most important tools in the entire process is often overlooked:
The cutting mat.
Choosing the right cutting mat can dramatically improve your crafting experience. The proper mat helps materials stay secure, ensures cleaner cuts, protects your machine, and reduces frustration during projects.
Whether you’re using a Silhouette Cameo®, Portrait®, or another Silhouette machine, understanding cutting mats is essential for getting professional-quality results.
In this guide, we’ll break down everything beginners and experienced crafters need to know about choosing the right cutting mat for their Silhouette machine.
What Does a Cutting Mat Do?
A cutting mat acts as the foundation for your material during the cutting process.
It helps:
- Hold materials in place
- Prevent shifting while cutting
- Improve cut accuracy
- Protect the machine from improper feeding
Without a proper cutting mat, even the best designs can result in:
- Misaligned cuts
- Torn materials
- Wasted supplies
Why Cutting Mats Matter in the Silhouette Ecosystem
The Silhouette ecosystem is built around precision.
Using:
- Silhouette cutting machines
- Silhouette Studio® software
- Materials like vinyl, cardstock, and sticker paper
Requires stability during cutting; and that’s exactly what the mat provides.
A properly chosen mat helps your machine:
- Feed materials smoothly
- Maintain alignment
- Produce cleaner, more consistent cuts
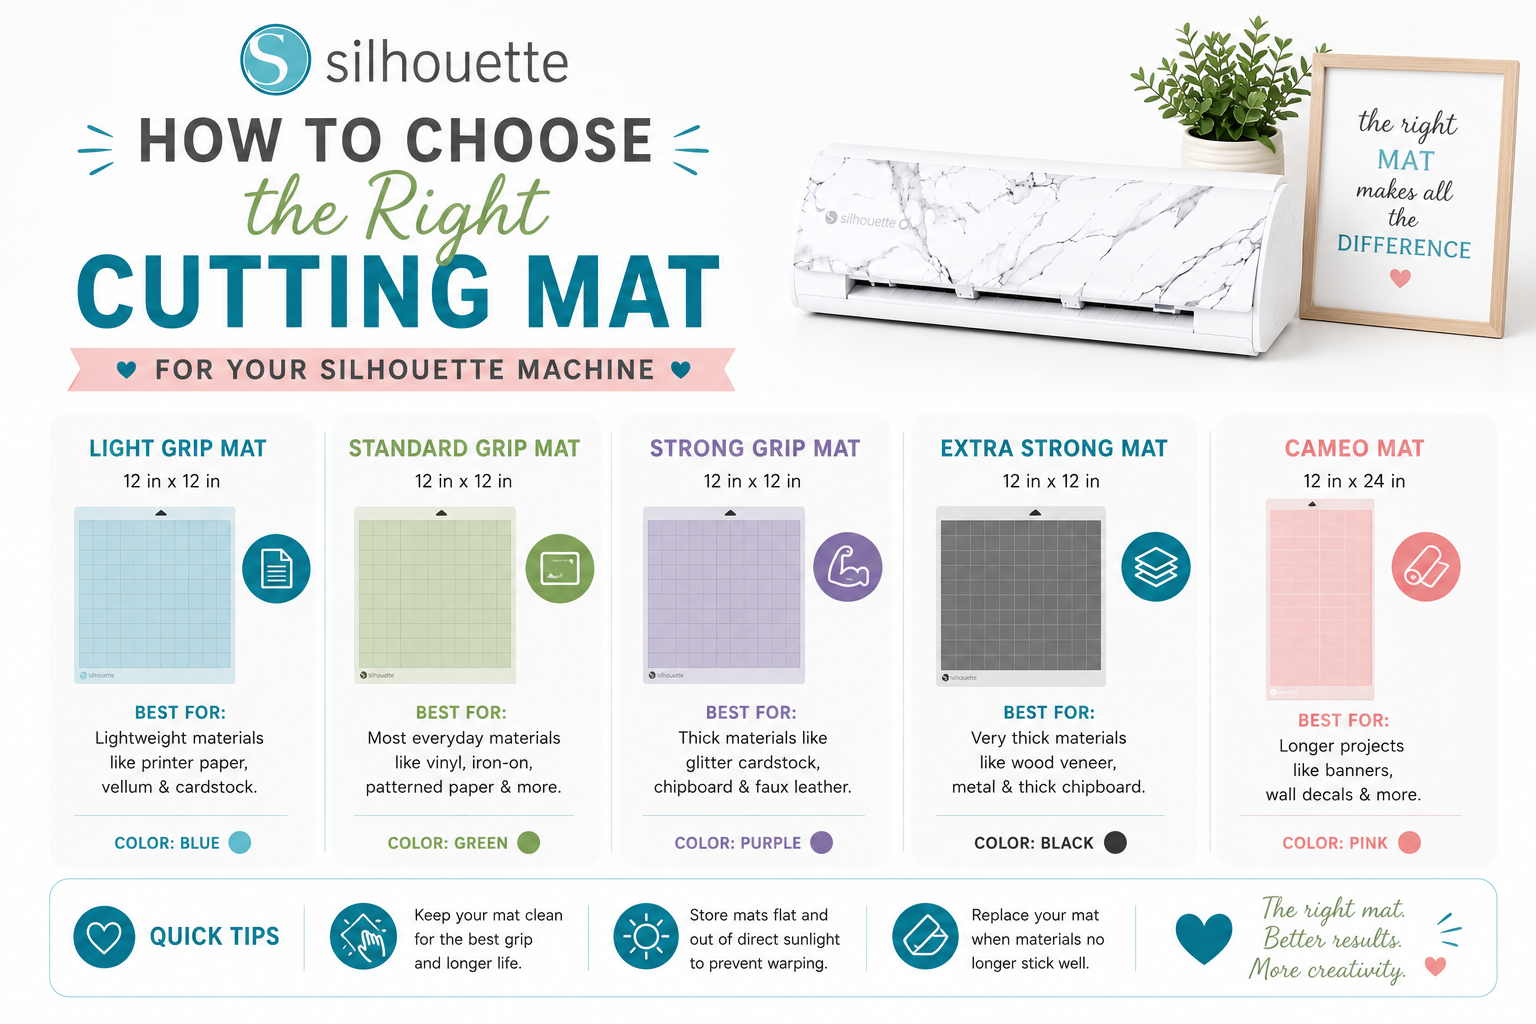
Understanding Silhouette Cutting Mat Types
Silhouette offers several mat types designed for different materials and crafting needs.
The biggest difference between mats is:
Adhesive strength (stickiness)
Different materials require different grip levels.
1. Standard Tack Cutting Mat
The Standard Tack Mat is the most versatile and commonly used option.
Best For
- Cardstock
- Patterned paper
- Vinyl
- Heat transfer vinyl (HTV)
Why It’s Popular
- Balanced adhesive strength
- Works for most everyday projects
- Great for beginners
Who Should Use It
If you’re new to Silhouette crafting, this is usually the best starting point.
2. Light Tack Cutting Mat
The Light Tack Mat is designed for delicate materials.
Best For
- Thin paper
- Printer paper
- Lightweight cardstock
- Delicate specialty papers
Why It Helps
Stronger mats can tear delicate materials during removal.
The Light Tack version:
- Holds gently
- Reduces tearing
- Makes paper projects easier
Best Projects
- Invitations
- Planner pages
- Lightweight paper crafts
3. Strong Tack Cutting Mat
The Strong Tack Mat is built for heavier materials.
Best For
- Thick cardstock
- Specialty materials
- Fabric with backing
- Chipboard (where supported)
Why It’s Useful
Heavier materials need extra grip to prevent movement during cutting.
Things to Watch
Because it’s very sticky:
- Delicate materials may tear
- Removal requires extra care
4. PixScan™ Mat
The PixScan™ Mat is a specialty mat designed for advanced workflows.
What It Does
It allows users to:
- Scan or photograph materials
- Position cuts precisely around printed or hand-drawn elements
Best For
- Precise placement projects
- Upcycling materials
- Sticker sheets
- Specialty layouts
Why It’s Unique
It combines:
- Physical materials
- Digital precision
How to Choose the Right Mat for Your Project
The best cutting mat depends on:
- Material type
- Material thickness
- Project complexity
Here’s a simple guide.
For Paper Crafts
Use:
Light Tack or Standard Tack
Ideal Projects:
- Cards
- Invitations
- Layered paper art
For Vinyl Projects
Use:
Standard Tack
Ideal Projects:
- Wall decals
- Labels
- T-shirts (HTV)
For Fabric Projects
Use:
Strong Tack
Ideal Projects:
- Fabric appliqués
- Sewing patterns
For Delicate Designs
Use:
Light Tack
This prevents tearing during removal.
Choosing the Right Mat Size
Silhouette mats come in different sizes to match machine compatibility.
Portrait Machines
Typically use:
- Smaller mats
- Compact cutting areas
Cameo Machines
Support:
- Larger mats
- Wider projects
Always check compatibility with your specific machine model.
How to Maintain Your Cutting Mat
A well-maintained mat lasts longer and performs better.
1. Keep It Clean
Dust, paper fibers, and vinyl scraps reduce stickiness.
How to Clean
- Use a lint roller
- Gently wipe with mild soap and water
- Let air dry completely
2. Store with the Protective Cover
Always replace the clear protective sheet after use.
This helps prevent:
- Dust buildup
- Drying out the adhesive
3. Remove Materials Carefully
Pull materials slowly to avoid:
- Tearing
- Damaging the adhesive surface
4. Rotate Usage Areas
Avoid cutting in the exact same spot every time.
This extends mat life and keeps adhesion more even.
When Should You Replace a Cutting Mat?
Even with good care, mats eventually wear out.
Signs It’s Time to Replace
- Materials no longer stick properly
- Deep cut marks appear
- Adhesive becomes uneven
- Frequent shifting during cuts
A worn mat can affect:
- Cut precision
- Material alignment
- Overall project quality
Can You Re-Stick a Cutting Mat?
Some crafters attempt to refresh mat stickiness with sprays or adhesives.
While possible, official Silhouette mats are designed for:
- Reliable performance
- Consistent adhesion
For best results, replacing the mat is usually the safest option.
How Cutting Mats Affect Design Quality
A surprising number of crafting problems actually come from using the wrong mat.
Common Issues Caused by Incorrect Mats
- Jagged cuts
- Material slipping
- Torn paper
- Misaligned designs
Using the correct mat dramatically improves:
- Precision
- Consistency
- Ease of crafting
Why Beginners Shouldn’t Ignore the Cutting Mat
Many new users focus heavily on:
- Blade settings
- Designs
- Materials
But the mat is equally important.
The right mat:
- Makes crafting smoother
- Reduces mistakes
- Improves confidence
Especially when learning.
How Silhouette Studio® and Mats Work Together
Silhouette Studio® allows you to:
- Match material settings
- Optimize cut pressure and speed
But those settings only work properly if your material stays stable; and that’s the cutting mat’s job.
The combination of:
- Proper settings
- Correct material
- Right cutting mat
Creates the best results.
Best Beginner Recommendation
If you’re just starting out:
Start with a Standard Tack Mat
It works well for:
- Most common materials
- Everyday projects
- Beginner learning curves
As your crafting expands, you can add:
- Light Tack for delicate paper
- Strong Tack for thicker materials
- PixScan for advanced precision projects
Final Thoughts: The Right Mat Makes All the Difference
Choosing the right cutting mat may seem like a small detail; but in reality, it’s one of the foundations of successful crafting.
With the right mat, your Silhouette machine performs better, your materials stay secure, and your projects look cleaner and more professional.
Combined with:
- Silhouette Studio®
- High-quality materials
- Creative designs and techniques
The right cutting mat helps unlock the full potential of your crafting workflow.
So the next time you start a project, don’t overlook the mat underneath it.
Because sometimes, the secret to better crafting isn’t just the design or the machine; it’s the foundation supporting it.