Keeping your 3D printing workflow smooth and efficient often depends on having the latest software features and bug fixes. One of the most important tools for Creality users is Creality Slicer, and regularly performing a creality slicer update ensures better print quality, improved stability, and access to new features.
This guide walks you through the complete installation and update process in a simple, beginner-friendly way so you can avoid errors and keep your slicing software running at its best.
Understanding Creality Slicer and Why Updates Matter
Creality Slicer is a specialized software used to convert 3D models into printable instructions (G-code). It helps users configure print settings like layer height, infill density, speed, and temperature. Without proper slicing software, a 3D printer cannot interpret digital models correctly.
A creality slicer update is essential because it improves compatibility with newer printers, enhances slicing algorithms, and fixes known bugs that may affect print quality or software performance.
Updates also often include new material profiles and printer presets, making it easier for beginners and professionals alike to achieve accurate results without manual configuration.
Preparing Your System Before Creality Slicer Update
Before installing a creality slicer update, it is important to prepare your system to avoid installation errors or data loss. Start by checking your current version of Creality Slicer and comparing it with the latest version available on the official website.
It is also recommended to back up your existing print profiles and settings. This ensures that your custom configurations are not lost during the update process and can be restored later if needed.
Additionally, close all running instances of the slicer and temporarily disable antivirus software if it interferes with installation. This helps ensure a smooth and uninterrupted update process.
Step-by-Step Installation of Creality Slicer Update
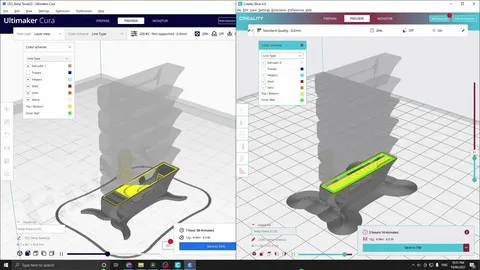
To begin the creality slicer update, download the latest version from the official Creality website. Make sure you select the correct version compatible with your operating system, such as Windows 10 or Windows 11.
Once the file is downloaded, run the installer and follow the on-screen instructions. The installation wizard will guide you through selecting the installation directory and agreeing to the license terms.
After installation, launch the updated software and verify the version number in the “About” section. This confirms that the update was successfully installed and is ready for use.
Troubleshooting Common Update Issues
Sometimes, users may encounter issues during a creality slicer update, such as installation failure, missing files, or software not launching correctly. These problems are usually caused by incomplete downloads or system compatibility issues.
If the installation fails, try re-downloading the installer from the official source. Ensure that your operating system meets the minimum requirements for the latest version of the slicer.
In cases where the software does not open after updating, reinstalling the program or running it as an administrator often resolves the issue. Clearing cache files from previous versions can also help eliminate conflicts.
Optimizing Settings After Creality Slicer Update
After completing a creality slicer update, it is important to review and optimize your slicing settings. New versions may reset some configurations, so checking layer height, print speed, and temperature settings is essential.
You should also explore updated printer profiles, as newer versions often include improved presets that enhance print accuracy and reduce errors during printing.
Testing a small calibration print after updating is a good practice. This helps ensure that your settings are correctly configured and that the slicer is producing accurate G-code for your printer.
Conclusion
Performing a regular creality slicer update is one of the simplest yet most effective ways to improve your 3D printing experience. It ensures you benefit from the latest features, bug fixes, and performance improvements offered by Creality.
By following the proper preparation, installation, troubleshooting, and optimization steps outlined in this guide, you can keep your slicing workflow stable and efficient. Whether you are a beginner or an advanced user, staying updated guarantees better print quality and a more reliable printing process.